Door Finishing Instructions
Paint and stain your ODL entry door with the best practices for Satin Smooth and Rift Cut textures.
PREPARATION
TIMING
Time allotted to finish door in order to comply with warranty:
• 4 weeks from installation date on Steel.
• 6 months from installation date on Fiberglass.
DOOR PREP
Door may be finished while hanging in the door frame or removed from the jamb (ODL recommends finishing the door
out of the frame on a flat, horizontal surface). If finished in the door frame, remove all hardware including weatherstrip.
Weatherstrip may be removed by gently pulling it out. Reinsert by pushing back in once the door has completely dried.
-
We recommend finishing doors:
-
In a horizontal position on a padded surface.
-
Out of direct sunlight.
-
Above 50 degrees and below 90 degrees Fahrenheit, or according to manufacturer’s instructions.
-
In a dew-free environment.
-
In a dust-free environment.
-
-
Allow doors to acclimate to local conditions for at least 24 hours.
-
For maximum paint adhesion on ODL doors, lightly scuff the surfaces with 220-grit sandpaper. Do not over sand or remove manufactured finish.
- Clean all surfaces with a lint free rag, mild detergent and water or TSP (Tri-sodium phosphate solution) and allow to fully dry.
- Clean all Fiberglass door surfaces with a lint free rag and denatured alcohol then allow to fully dry.
- If the door contains glass insert and exhibits excess sealant or squeeze out, follow the guidelines below:
- Spray the area with standard glass cleaner.
- Carefully score the excess sealant with a utility knife at a 45-degree angle
- Use caution not to scratch the glass.
- An exterior grade primer prior to painting is recommended on Fiberglass doors. Never use lacquer thinner.
PAINTING SATIN SMOOTH
MATERIALS NEEDED
The following list of materials is a general list required for painting doors properly. Not all materials and tools may be required based on the finishing project.
- Safety Glasses & Rubber/Latex Gloves
- Dust Mask/Respirator Suitable for Painting
- 2 Stir Sticks
- Screwdriver
- Hammer
- Punch
- Utility Knife
- Paintbrush/Roller or Sprayer
- Denatured Alcohol
- Masking Tape
- Sandpaper (220-grit) or 3M stripping pad
- Clean Lint Free Cloth
- Paint Thinner or Mineral Spirits (Clean-Up)
- Exterior Grade Primer
- Paint (Exterior Grade High-Quality Acrylic Latex)
PAINTING INSTRUCTIONS
- Once door has been prepped, put on protective gloves.
- Using an exterior grade, high-quality acrylic latex paint, mix contents thoroughly according to manufacturer
- Apply paint to door using a sprayer, roller or brush. Refer to paint manufacturer’s instructions for best results by application
- All 6 sides of door must be finished to comply with warranty.
- Allow paint to fully dry per manufacturer’s instructions.
- Flip door on to clean, padded surface and repeat process for second side.
- Follow manufacturer's instructions for applying additional coats.
- If the door contains glass insert, follow door glass frame finishing instructions.
PAINTING TIPS:
- ODL Satin Smooth Fiberglass Doors are manufactured with a brush-stroke finish which promotes superior paint-adherence.
- If painted door is exposed to direct sunlight, darker color finishes may deteriorate quickly and require frequent inspection and maintenance.
STAINING RIFT CUT
MATERIALS NEEDED
The following list of materials is a general list required for painting doors properly. Not all materials and tools may be required based on the finishing project.
- Safety Glasses & Rubber/Latex Gloves
- Dust Mask/Respirator Suitable for Painting
- 2 Stir Sticks
- Screwdriver
- Hammer
- Punch
- Utility Knife
- Synthetic Paintbrush (One 2½", One 1")
- Staining Rag/Foam Brush
- Denatured Alcohol
- Masking Tape
- Clean Lint Free Cloth
- Paint Thinner or Mineral Spirits (Clean-up)
- Stain (Gel or Opaque Heavily Pigmented Oil Base}
- Polyurethane Top-Coat with UV Inhibitor
STAINING INSTRUCTIONS
- Once door has been prepped, put on protective gloves.
- Using a gel stain or opaque, heavily pigmented oil base stain, mix contents thoroughly according to stain manufacturer's directions.
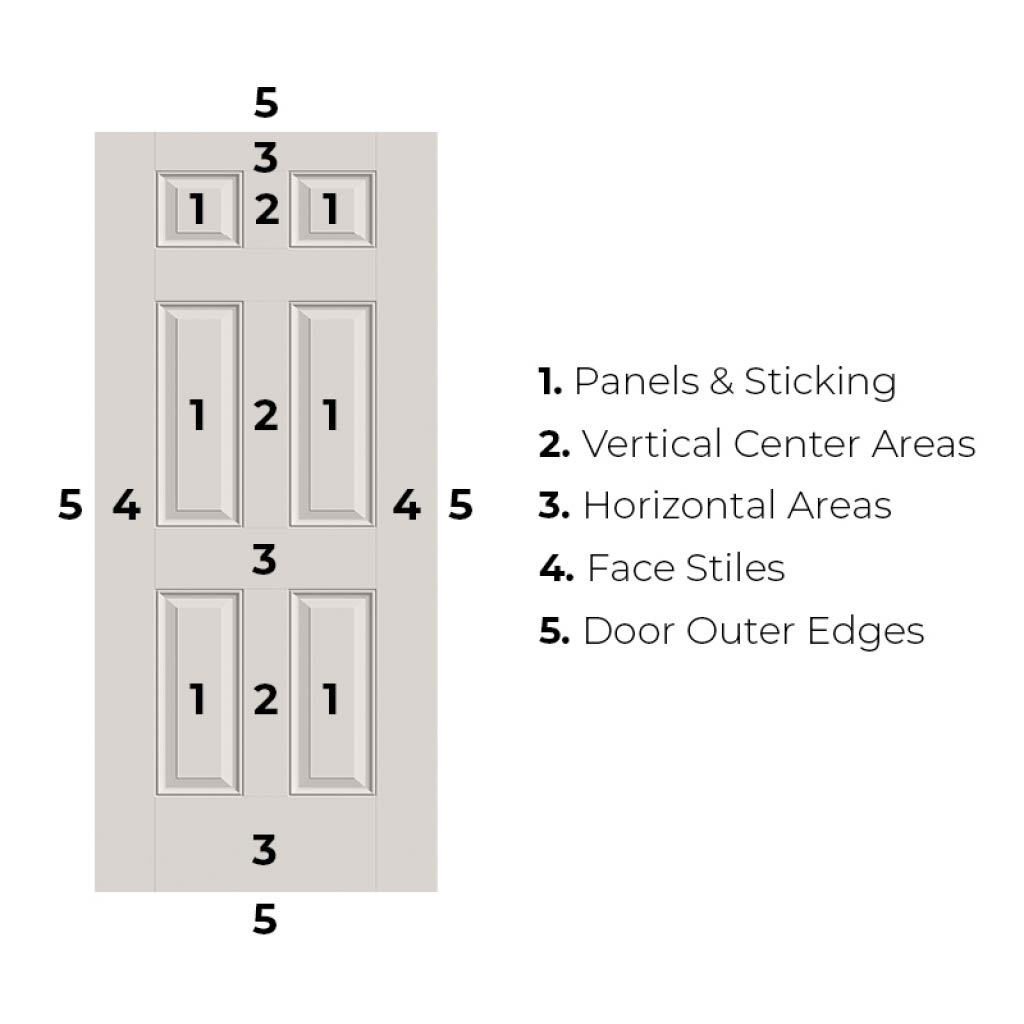
- Working in the prescribed order detailed in Image 1 work stain into door in a circular motion with staining rag or foam brush.
STAINING
Pro Tips
- ODL reccommends using a staining rag for superior application.
- Only stain one area at a time.
(1 Panel, 1 Horizontal, 1 Stile, etc.)
- Using a clean, dry rag remove stain by wiping in the direction of the grain. Pressure on the rag will determine the amount of stain that is removed from the door.
- Using a dry 1" synthetic brush, blend stain with light brush strokes. Stain will tend to gather in the panel corners
- and the brush will allow stain to be blended. Frequently clean brush with dry rag to remove stain from bristles.
- Allow stain to fully dry per manufacturer's instructions.
- Flip door on to clean, padded surface and repeat process for second side.
- Follow manufacturer's instructions for applying additional coats.
PROTECTIVE TOP-COAT
- Once the stain has completely dried, mix polyurethane topcoat according to manufacturer's directions. Do not shake can to mix.
- Follow the same order for applying the topcoat as described for staining.
- Apply topcoat with a high quality 21/2'' synthetic brush. Do not overload the brush with polyurethane.
- Follow topcoat manufacturer's directions for applying additional coats. Remember to seal top and bottom edges of the door.
CONTINUED MAINTENANCE
- All finished doors will require maintenance over time. The frequency of maintenance will be based on exposure to the sun, climatic weathering and air pollutants. Best practice would be to inspect annually.
- When the topcoat gloss has lost its sheen and/or the surface feels rough to touch, it is time for the door to be topcoated.
Need more help?
Our Customer Support team would be happy to help you. Find our contact information.